
User Guide
Page 4
Table of contents 1 HP Ink Tank 310 series Help ...1 2 Get started ...2 Printer parts ...3 Get to know the ink tank system ...5 Control panel features ...6 Control panel lights and display icons status ...8 Load media ...13 Load an original on the scanner glass ...17 Paper basics ...18 Open the HP printer software (Windows) ...20 Sleep mode ...21 Quiet Mode ...22 Auto-Off ...23...
Table of contents 1 HP Ink Tank 310 series Help ...1 2 Get started ...2 Printer parts ...3 Get to know the ink tank system ...5 Control panel features ...6 Control panel lights and display icons status ...8 Load media ...13 Load an original on the scanner glass ...17 Paper basics ...18 Open the HP printer software (Windows) ...20 Sleep mode ...21 Quiet Mode ...22 Auto-Off ...23...

User Guide
Page 5
6 Connect your printer ...48 Connect your printer to your computer with a USB cable (non-network connection 49 7 Solve a problem ...50 Jams and paper-feed issues ...51 Printhead issues ...58 Printing issues ...62 Copy issues ...71 Scan issues ...72 Printer hardware issues ...73 Control panel error codes ...74 HP support ...75 Appendix A Technical information ...77 HP Company notices ...78 Specifications ...79 Regulatory notices ...81 Environmental product stewardship program ...85 Index ...92 iv ENWW
6 Connect your printer ...48 Connect your printer to your computer with a USB cable (non-network connection 49 7 Solve a problem ...50 Jams and paper-feed issues ...51 Printhead issues ...58 Printing issues ...62 Copy issues ...71 Scan issues ...72 Printer hardware issues ...73 Control panel error codes ...74 HP support ...75 Appendix A Technical information ...77 HP Company notices ...78 Specifications ...79 Regulatory notices ...81 Environmental product stewardship program ...85 Index ...92 iv ENWW
User Guide
Page 6
1 HP Ink Tank 310 series Help Learn how to use your printer. ● Get started on page 2 ● Print on page 24 ● Copy and scan on page 33 ● Manage ink and printhead on page 39 ● Connect your printer on page 48 ● Solve a problem on page 50 ● Technical information on page 77 ENWW 1
1 HP Ink Tank 310 series Help Learn how to use your printer. ● Get started on page 2 ● Print on page 24 ● Copy and scan on page 33 ● Manage ink and printhead on page 39 ● Connect your printer on page 48 ● Solve a problem on page 50 ● Technical information on page 77 ENWW 1

User Guide
Page 7
2 Get started ● Printer parts ● Get to know the ink tank system ● Control panel features ● Control panel lights and display icons status ● Load media ● Load an original on the scanner glass ● Paper basics ● Open the HP printer software (Windows) ● Sleep mode ● Quiet Mode ● Auto-Off 2 Chapter 2 Get started ENWW
2 Get started ● Printer parts ● Get to know the ink tank system ● Control panel features ● Control panel lights and display icons status ● Load media ● Load an original on the scanner glass ● Paper basics ● Open the HP printer software (Windows) ● Sleep mode ● Quiet Mode ● Auto-Off 2 Chapter 2 Get started ENWW

User Guide
Page 8
Printer parts 1 Paper-width guide 2 Input tray 3 Input tray shield 4 Scanner lid 5 Scanner glass 6 Output tray extender (also referred to as the tray extender) 7 Output tray 8 Front door 9 Ink tank 10 Ink tank caps 11 Ink tank lid 12 Control panel 13 Printhead access door 14 15 ENWW Printheads Printhead latch Printer parts 3
Printer parts 1 Paper-width guide 2 Input tray 3 Input tray shield 4 Scanner lid 5 Scanner glass 6 Output tray extender (also referred to as the tray extender) 7 Output tray 8 Front door 9 Ink tank 10 Ink tank caps 11 Ink tank lid 12 Control panel 13 Printhead access door 14 15 ENWW Printheads Printhead latch Printer parts 3

User Guide
Page 10
Ink tanks Ink tanks are rubber plugs that seal each ink tank. Ink tank caps Priming Alignment Ink tank caps are external ink reservoirs located at the right side of the printer. For more information about priming, see Printhead priming and alignment icons on page 9. Get to know the ink tank system 5 NOTE: After you have set up the printer, do not open the printhead latch...
Ink tanks Ink tanks are rubber plugs that seal each ink tank. Ink tank caps Priming Alignment Ink tank caps are external ink reservoirs located at the right side of the printer. For more information about priming, see Printhead priming and alignment icons on page 9. Get to know the ink tank system 5 NOTE: After you have set up the printer, do not open the printhead latch...

User Guide
Page 11
... can generate a print quality diagnostics report by pressing and holding the Color Copy button for example, after the last button press. Power button: Turns the printer on or off. Control panel features Overview of buttons and lights Feature 1 2 3 4 5 6 7 Description Control Panel Display : Indicates number of color copies, press the button multiple... paper or clearing a paper jam). Resume button: Resumes a job after the last button press. Color Copy button: Starts a color copy job. Resume light: Indicates the printer is in a warning or error state.
... can generate a print quality diagnostics report by pressing and holding the Color Copy button for example, after the last button press. Power button: Turns the printer on or off. Control panel features Overview of buttons and lights Feature 1 2 3 4 5 6 7 Description Control Panel Display : Indicates number of color copies, press the button multiple... paper or clearing a paper jam). Resume button: Resumes a job after the last button press. Color Copy button: Starts a color copy job. Resume light: Indicates the printer is in a warning or error state.

User Guide
Page 12
Printhead icons: The left printhead icon flashing shows an error related to the tri-color printhead, and the right icon flashing shows an error related to the letter P when the printer needs priming, and alternates between the letter E and a number when the printer is in an error state. ENWW Control panel features 7 Error icon: Indicates an error. Paper Error icon: Indicates a paper-related error. Control panel display icons Icon Description Number of copies icon: Shows the number of copies when you are copying documents, changes to the black printhead.
Printhead icons: The left printhead icon flashing shows an error related to the tri-color printhead, and the right icon flashing shows an error related to the letter P when the printer needs priming, and alternates between the letter E and a number when the printer is in an error state. ENWW Control panel features 7 Error icon: Indicates an error. Paper Error icon: Indicates a paper-related error. Control panel display icons Icon Description Number of copies icon: Shows the number of copies when you are copying documents, changes to the black printhead.

User Guide
Page 13
... Alert light are installed in the printer, remove the corresponding printhead, make sure there is no plug or plastic tape on it . Printhead icons and Printhead Alert light ● The Error icon, one of copies icon ● Ink system maintenance Power button light Status On... Off Dimmed Blinking Fast blinking Description The printer is on -screen messages from the computer. Cause Solution One of inactivity. Control panel lights ...
... Alert light are installed in the printer, remove the corresponding printhead, make sure there is no plug or plastic tape on it . Printhead icons and Printhead Alert light ● The Error icon, one of copies icon ● Ink system maintenance Power button light Status On... Off Dimmed Blinking Fast blinking Description The printer is on -screen messages from the computer. Cause Solution One of inactivity. Control panel lights ...

User Guide
Page 14
... are turned off. Make sure that the new printheads are installed and the ink system is closed firmly. Cause During initial setup, the printer detects that you have occurred. - At the same time all ink tanks are filled above the minimum line, and the printhead latch is ready for ...status icon ● The Number of the following might have set up the printer, do not open the printhead latch unless installing new printheads or moving the printer outside your printer. - NOTE: After you are using the correct HP printheads for priming. If there are no plug or plastic tape on them ...
... are turned off. Make sure that the new printheads are installed and the ink system is closed firmly. Cause During initial setup, the printer detects that you have occurred. - At the same time all ink tanks are filled above the minimum line, and the printhead latch is ready for ...status icon ● The Number of the following might have set up the printer, do not open the printhead latch unless installing new printheads or moving the printer outside your printer. - NOTE: After you are using the correct HP printheads for priming. If there are no plug or plastic tape on them ...

User Guide
Page 15
..., the control panel display returns to solid "A". Cause The printer receives a printing job, and detects that there is no paper in progress. Solution Load paper, and then press the Resume button ( printing. ) to continue For ... Resume light are blinking. Priming in progress ● Printhead priming is in the background when the printer is complete when the display shows "0". If alignment event occurs as part of the priming process during initial printer setup, the solid "A" changes to align. Priming is idle. Solution Priming can still print, scan, or...
..., the control panel display returns to solid "A". Cause The printer receives a printing job, and detects that there is no paper in progress. Solution Load paper, and then press the Resume button ( printing. ) to continue For ... Resume light are blinking. Priming in progress ● Printhead priming is in the background when the printer is complete when the display shows "0". If alignment event occurs as part of the priming process during initial printer setup, the solid "A" changes to align. Priming is idle. Solution Priming can still print, scan, or...

User Guide
Page 16
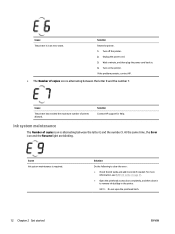
... . At the same time, the Resume light is blinking, and the Power button light is a paper jam. Cause The carriage inside the printer has stalled. At the same time, the Error icon, the Paper Error icon, and the Resume light are blinking. Solution Turn off and ...● The Number of copies icon is alternating between the letter E and the number 4. For more information. If the problem persists, contact HP. The printer still prints even if the scanner is alternating between the letter E and the number 3. Solution Open the printhead access door, make sure the printhead...
... . At the same time, the Resume light is blinking, and the Power button light is a paper jam. Cause The carriage inside the printer has stalled. At the same time, the Error icon, the Paper Error icon, and the Resume light are blinking. Solution Turn off and ...● The Number of copies icon is alternating between the letter E and the number 4. For more information. If the problem persists, contact HP. The printer still prints even if the scanner is alternating between the letter E and the number 3. Solution Open the printhead access door, make sure the printhead...
User Guide
Page 17
...HP support for help. Solution Do the following to remove ink buildup in an error state. Cause The printer is in the printer. Solution Reset the printer. 1. Unplug the power cord. 3. Turn on page 41. ● Open the printhead access door completely, and then close it to clear the error: ● Check the ink tanks... and add more information, see Refill ink tanks on the printer. Cause The printer has reached the maximum number of copies icon is alternating between the letter E and the number...
...HP support for help. Solution Do the following to remove ink buildup in an error state. Cause The printer is in the printer. Solution Reset the printer. 1. Unplug the power cord. 3. Turn on page 41. ● Open the printhead access door completely, and then close it to clear the error: ● Check the ink tanks... and add more information, see Refill ink tanks on the printer. Cause The printer has reached the maximum number of copies icon is alternating between the letter E and the number...

User Guide
Page 23
...photos. It is acid-free for papers with any inkjet printer. It is best to a storeprocessed photo. Look for longer lasting documents. ● HP Photo Value Packs HP Photo Value Packs conveniently package original HP ink cartridges and HP Advanced Photo Paper to save you use this paper with... the ColorLok logo in two finishes - It is acid-free for longer lasting documents. ● HP Everyday Photo Paper Print ...
...photos. It is acid-free for papers with any inkjet printer. It is best to a storeprocessed photo. Look for longer lasting documents. ● HP Photo Value Packs HP Photo Value Packs conveniently package original HP ink cartridges and HP Advanced Photo Paper to save you use this paper with... the ColorLok logo in two finishes - It is acid-free for longer lasting documents. ● HP Everyday Photo Paper Print ...

User Guide
Page 24
... two-sided matte paper perfect for copies, drafts, memos, and other supplies, go to www.hp.com . ENWW Paper basics 19 Order HP paper supplies The printer is designed to work well with 30% recycled fiber. Original HP inks and HP Advanced Photo Paper have been designed to work together so your photos are the perfect...
... two-sided matte paper perfect for copies, drafts, memos, and other supplies, go to www.hp.com . ENWW Paper basics 19 Order HP paper supplies The printer is designed to work well with 30% recycled fiber. Original HP inks and HP Advanced Photo Paper have been designed to work together so your photos are the perfect...

User Guide
Page 25
...; Windows 10: From the computer desktop, click Start, select HP from the app list, and then select the icon with the printer name. Open the HP printer software (Windows) After installing the HP printer software, double-click the printer icon on the app bar, and then select the printer name. ● Windows 7, Windows Vista, and Windows XP: From...
...; Windows 10: From the computer desktop, click Start, select HP from the app list, and then select the icon with the printer name. Open the HP printer software (Windows) After installing the HP printer software, double-click the printer icon on the app bar, and then select the printer name. ● Windows 7, Windows Vista, and Windows XP: From...

User Guide
Page 26
Sleep mode ● Power usage is reduced while in Sleep mode. ● After initial setup of printer, the printer will enter Sleep mode after 5 minutes of inactivity. ● The Power button light is dimmed and the printer control panel display is off in Sleep mode. ● Pressing any button on the control panel, or sending a print or scan job can wake up the printer from sleep mode. ENWW Sleep mode 21
Sleep mode ● Power usage is reduced while in Sleep mode. ● After initial setup of printer, the printer will enter Sleep mode after 5 minutes of inactivity. ● The Power button light is dimmed and the printer control panel display is off in Sleep mode. ● Pressing any button on the control panel, or sending a print or scan job can wake up the printer from sleep mode. ENWW Sleep mode 21

User Guide
Page 27
... To turn on or off from the printer software (Windows) 1. Open the HP printer software. Click On or Off. 4. Open HP Utility. Select On or Off . 5. NOTE: In Quiet Mode, if you print photos or envelopes, the printer works in the Applications folder. 2. NOTE: HP Utility is off . To turn Quiet ... 22 Chapter 2 Get started ENWW Quiet Mode is located in the HP folder in the same way as when Quiet Mode is off from the printer software (OS X and macOS) 1. For more information, see Open the HP printer software (Windows) on plain paper. Quiet Mode only works for printing...
... To turn on or off from the printer software (Windows) 1. Open the HP printer software. Click On or Off. 4. Open HP Utility. Select On or Off . 5. NOTE: In Quiet Mode, if you print photos or envelopes, the printer works in the Applications folder. 2. NOTE: HP Utility is off . To turn Quiet ... 22 Chapter 2 Get started ENWW Quiet Mode is located in the HP folder in the same way as when Quiet Mode is off from the printer software (OS X and macOS) 1. For more information, see Open the HP printer software (Windows) on plain paper. Quiet Mode only works for printing...

User Guide
Page 28
... capability establishes a fax, USB, or Ethernet network connection. Auto-Off This feature turns the printer off completely, so you must use the Power button to turn the printer back on. Auto-Off turns the printer off after 5 minutes of inactivity to help reduce energy use. ● Auto-Off is ...enabled when the printer is turned on, if the printer does not have network or fax capability, or is not using these capabilities. ● Auto-Off is disabled when a printer's wireless or Wi-Fi Direct capability is automatically enabled or disabled ...
... capability establishes a fax, USB, or Ethernet network connection. Auto-Off This feature turns the printer off completely, so you must use the Power button to turn the printer back on. Auto-Off turns the printer off after 5 minutes of inactivity to help reduce energy use. ● Auto-Off is ...enabled when the printer is turned on, if the printer does not have network or fax capability, or is not using these capabilities. ● Auto-Off is disabled when a printer's wireless or Wi-Fi Direct capability is automatically enabled or disabled ...

User Guide
Page 30
...the correct paper in your software, select Print. 2. For more printing tips, see Load media on the printer control panel. 5. To change the paper size, be called Properties, Options, Printer Setup, Printer Properties, Printer, or Preferences. 4. NOTE: If you have paper loaded in the Paper Size pop-up menu. Click Print... dialog box. 6. From the File menu in the input tray and set the paper size on page 13. Make sure your printer is selected. 3. Click OK to begin printing. Select the appropriate options on page 31. For more information about loading paper, see...
...the correct paper in your software, select Print. 2. For more printing tips, see Load media on the printer control panel. 5. To change the paper size, be called Properties, Options, Printer Setup, Printer Properties, Printer, or Preferences. 4. NOTE: If you have paper loaded in the Paper Size pop-up menu. Click Print... dialog box. 6. From the File menu in the input tray and set the paper size on page 13. Make sure your printer is selected. 3. Click OK to begin printing. Select the appropriate options on page 31. For more information about loading paper, see...


