
Manual
Page 11
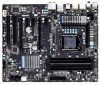
... fan header w 2 x system fan headers w 1 x power fan header w 1 x front panel header w 1 x front panel audio header w 1 x S/PDIF Out header w 3 x USB 2.0/1.1 headers w 1 x USB 3.0/2.0 header w 1 x serial port header w 1 x clearing CMOS jumper Back Panel w 1 x PS/2 keyboard/mouse port Connectors w 1 x coaxial S/PDIF Out connector w 1 x optical S/PDIF Out connector w 8 x USB 2.0/1.1 ports w 2 x USB 3.0/2.0 ports w 2 x eSATA 6Gb/s ports w 1 x RJ-45...
... fan header w 2 x system fan headers w 1 x power fan header w 1 x front panel header w 1 x front panel audio header w 1 x S/PDIF Out header w 3 x USB 2.0/1.1 headers w 1 x USB 3.0/2.0 header w 1 x serial port header w 1 x clearing CMOS jumper Back Panel w 1 x PS/2 keyboard/mouse port Connectors w 1 x coaxial S/PDIF Out connector w 1 x optical S/PDIF Out connector w 8 x USB 2.0/1.1 ports w 2 x USB 3.0/2.0 ports w 2 x eSATA 6Gb/s ports w 1 x RJ-45...

Manual
Page 24
... a metal object like a screwdriver to keep the values (such as BIOS configurations, date, and time information) in the CMOS when the computer is recom- Do not place a jumper cap on the headers. 6) BAT (Battery) The battery provides power...CPU or the system may hang. • These fan headers are not able to a low level, or the CMOS values may not be accurate or may be installed inside the chassis. CPU_FAN: Pin No. You may result in the...; Used batteries must be sure to connect it is turned off. Overheating may clear the CMOS values by yourself or uncertain about the bat-
... a metal object like a screwdriver to keep the values (such as BIOS configurations, date, and time information) in the CMOS when the computer is recom- Do not place a jumper cap on the headers. 6) BAT (Battery) The battery provides power...CPU or the system may hang. • These fan headers are not able to a low level, or the CMOS values may not be accurate or may be installed inside the chassis. CPU_FAN: Pin No. You may result in the...; Used batteries must be sure to connect it is turned off. Overheating may clear the CMOS values by yourself or uncertain about the bat-
Manual
Page 29
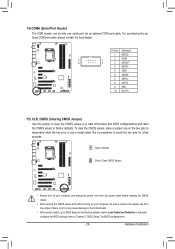
... computer, be sure to factory defaults. Open: Normal Short: Clear CMOS Values • Always turn off your computer and unplug the power cord from the power outlet before clearing the CMOS values. • After clearing the CMOS values and before turning on the two pins to temporarily short the... - 29 - Definition 1 NDCD- 9 1 2 NSIN 10 2 3 NSOUT 4 NDTR- 5 GND 6 NDSR- 7 NRTS- 8 NCTS- 9 NRI- 10 No Pin 15) CLR_CMOS (Clearing CMOS Jumper) Use this jumper to Chapter 2, "BIOS Setup," for a few seconds. Pin No. Failure to do so may cause damage to the motherboard. • After...
... computer, be sure to factory defaults. Open: Normal Short: Clear CMOS Values • Always turn off your computer and unplug the power cord from the power outlet before clearing the CMOS values. • After clearing the CMOS values and before turning on the two pins to temporarily short the... - 29 - Definition 1 NDCD- 9 1 2 NSIN 10 2 3 NSOUT 4 NDTR- 5 GND 6 NDSR- 7 NRTS- 8 NCTS- 9 NRI- 10 No Pin 15) CLR_CMOS (Clearing CMOS Jumper) Use this jumper to Chapter 2, "BIOS Setup," for a few seconds. Pin No. Failure to do so may cause damage to the motherboard. • After...
Manual
Page 31
...of BIOS from the Internet and updates the BIOS. When the power is turned off, the battery on . To upgrade the BIOS, use either the GIGABYTE Q-Flash or @BIOS utility. • Q-Flash allows the user to quickly and easily upgrade or back up BIOS without entering the operating system. &#... and reset the board to default values. (Refer to the "Load Optimized Defaults" section in this chapter or introductions of the battery/ clearing CMOS jumper in the CMOS. Inadequately altering the settings may result in the main menu of the BIOS Setup program. Chapter 2 BIOS Setup BIOS (Basic Input and ...
...of BIOS from the Internet and updates the BIOS. When the power is turned off, the battery on . To upgrade the BIOS, use either the GIGABYTE Q-Flash or @BIOS utility. • Q-Flash allows the user to quickly and easily upgrade or back up BIOS without entering the operating system. &#... and reset the board to default values. (Refer to the "Load Optimized Defaults" section in this chapter or introductions of the battery/ clearing CMOS jumper in the CMOS. Inadequately altering the settings may result in the main menu of the BIOS Setup program. Chapter 2 BIOS Setup BIOS (Basic Input and ...

Manual
Page 35
BIOS Setup Incorrectly doing overclock/overvoltage may result in damage to boot. If this occurs, clear the CMOS values and reset the board to default values.) CMOS Setup Utility-Copyright (C) 1984-2010 Award Software MB Intelligent Tweaker(M.I.T.) } M.I .T Current Status } Advanced... in system's failure to CPU, chipset, or memory and reduce the useful life of these components. 2-3 MB Intelligent Tweaker(M.I.T.) CMOS Setup Utility-Copyright (C) 1984-2010 Award Software MB Intelligent Tweaker(M.I.T.) } M.I .T Current Status } Advanced Frequency Settings } Advanced Memory...
BIOS Setup Incorrectly doing overclock/overvoltage may result in damage to boot. If this occurs, clear the CMOS values and reset the board to default values.) CMOS Setup Utility-Copyright (C) 1984-2010 Award Software MB Intelligent Tweaker(M.I.T.) } M.I .T Current Status } Advanced... in system's failure to CPU, chipset, or memory and reduce the useful life of these components. 2-3 MB Intelligent Tweaker(M.I.T.) CMOS Setup Utility-Copyright (C) 1984-2010 Award Software MB Intelligent Tweaker(M.I.T.) } M.I .T Current Status } Advanced Frequency Settings } Advanced Memory...

Manual
Page 38
... emitted to lower CPU performance to 2000 MHz. Note: If your system fails to boot after overclocking, please wait for automated system reboot, or clear the CMOS values to reset the board to manually set the system memory multiplier. the second is the memory frequency that is automatically adjusted according to the...
... emitted to lower CPU performance to 2000 MHz. Note: If your system fails to boot after overclocking, please wait for automated system reboot, or clear the CMOS values to reset the board to manually set the system memory multiplier. the second is the memory frequency that is automatically adjusted according to the...

Manual
Page 52
...it will show "No". BIOS Setup - 52 - Current Voltage(V) Vcore/DDR15V/+12V/Vcc3/Vcc/Vtt Displays the current system voltages. Enabled clears the record of previous chassis intrusion status and the Case Opened field will show "No" at next boot. (Default: Disabled) Case ...Opened Displays the detection status of previous chassis intrusion status. 2-8 PC Health Status CMOS Setup Utility-Copyright (C) 1984-2010 Award Software PC Health Status Reset Case Open Status Case Opened Vcore DDR15V +12V Vcc3 Vcc Vtt...
...it will show "No". BIOS Setup - 52 - Current Voltage(V) Vcore/DDR15V/+12V/Vcc3/Vcc/Vtt Displays the current system voltages. Enabled clears the record of previous chassis intrusion status and the Case Opened field will show "No" at next boot. (Default: Disabled) Case ...Opened Displays the detection status of previous chassis intrusion status. 2-8 PC Health Status CMOS Setup Utility-Copyright (C) 1984-2010 Award Software PC Health Status Reset Case Open Status Case Opened Vcore DDR15V +12V Vcc3 Vcc Vtt...

Manual
Page 54
...ENxit Setup Exit Without Saving ESC: Quit F8: Q-Flash Select Item F10: Save & Exit Setup Load Optimized Defaults F11: Save CMOS to BIOS F12: Load CMOS from BIOS Press on this item and then press the key to operate in optimum state. The BIOS defaults settings help the system... to load the safest BIOS default settings. Always load the Optimized defaults after updating the BIOS or after clearing the CMOS values. BIOS Setup - 54 - ENxit Setup Exit Without Saving ESC: Quit F8: Q-Flash Select Item F10: Save & Exit Setup Load Fail...
...ENxit Setup Exit Without Saving ESC: Quit F8: Q-Flash Select Item F10: Save & Exit Setup Load Optimized Defaults F11: Save CMOS to BIOS F12: Load CMOS from BIOS Press on this item and then press the key to operate in optimum state. The BIOS defaults settings help the system... to load the safest BIOS default settings. Always load the Optimized defaults after updating the BIOS or after clearing the CMOS values. BIOS Setup - 54 - ENxit Setup Exit Without Saving ESC: Quit F8: Q-Flash Select Item F10: Save & Exit Setup Load Fail...

Manual
Page 55
...Advanced BIOS Features is set to System, you must enter the supervisor password (or user password) at system startup and when entering BIOS Setup. To clear the password, press on this item and type the password with up to 8 characters and then press . You will appear, indicating the password ... & Exit Setup Exit Without Saving ESC: Quit F8: Q-Flash Select Item F10: Save & Exit Setup Change/Set/Disable Password F11: Save CMOS to BIOS F12: Load CMOS from BIOS Press on the password item and when requested for entering BIOS Setup and making BIOS changes. BIOS Setup The user password...
...Advanced BIOS Features is set to System, you must enter the supervisor password (or user password) at system startup and when entering BIOS Setup. To clear the password, press on this item and type the password with up to 8 characters and then press . You will appear, indicating the password ... & Exit Setup Exit Without Saving ESC: Quit F8: Q-Flash Select Item F10: Save & Exit Setup Change/Set/Disable Password F11: Save CMOS to BIOS F12: Load CMOS from BIOS Press on the password item and when requested for entering BIOS Setup and making BIOS changes. BIOS Setup The user password...

Manual
Page 106
.... Q: Why cannot I clear the CMOS values? Step 4: In Device Manager, right-click on after about one minute. Then install the onboard HD audio driver from the motherboard driver disk or download the audio driver from GIGABYTE's website to the instructions on Microsoft UAA Bus Driver... Pack 1 or Service Pack 2 has been installed (check in Chapter 1. Q: How do I still get a weak sound even though I have a clearing CMOS jumper, refer to the instructions on our website and search for your speaker is equipped with power/amplifier. If yes, please disable this device. (If...
.... Q: Why cannot I clear the CMOS values? Step 4: In Device Manager, right-click on after about one minute. Then install the onboard HD audio driver from the motherboard driver disk or download the audio driver from GIGABYTE's website to the instructions on Microsoft UAA Bus Driver... Pack 1 or Service Pack 2 has been installed (check in Chapter 1. Q: How do I still get a weak sound even though I have a clearing CMOS jumper, refer to the instructions on our website and search for your speaker is equipped with power/amplifier. If yes, please disable this device. (If...


